Develop a Gridsome source plugin
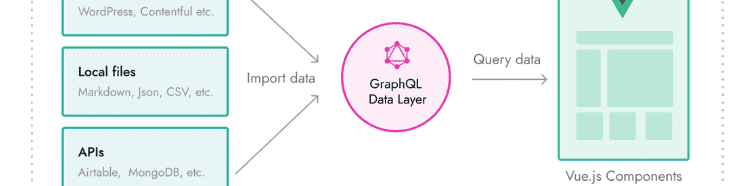
One method of importing data into a Gridsome build is to use a source plugin. In this post I'll walk you through how to build one.
Most likely you have used one of the many plugins available. This involves installing an NPM package, and configuring Gridsome to use it by updating the gridsome.config.js file. We will create a project for the NPM package, but what we don't want to do is continually build and publish a package whilst developing. The trick is to use npm link.
I'm going to base my example on the BikeWise API. This endpoint allows us to retrieve data on incidents involving bikes. No particular reason why I've chosen this, other than I wanted to create something that uses real data. First, lets create the project for our example source plugin:
mkdir source-bikewise
cd source-bikewise
npm init
Fill out the questions. When it comes to the package name call it gridsome-source-* or @username/gridsome-source-*, and for the keywords property enter gridsome-plugin. This appears to be the convention if you decide to publish your plugin. And why wouldn't you?
Create a index.js file, and add the following plugin code:
const axios = require('axios')

class BikeWiseSource {
  // Default options that can be configured in gridsome.config.js.
  static defaultOptions () {
    return {
      baseUri: 'https://bikewise.org/api/v2',
      page: 1,
      perPage: 10,
      incidentType: undefined
    }
  }

  constructor (api, options) {
    api.loadSource(async actions => {
      // Create and instance of Axios for the BikeWise API requests.
      const bikeWiseApi = axios.create({
        baseURL: options.baseUri,
        timeout: 5000
      })

      // This is executed when any Axios request is made.
      bikeWiseApi.interceptors.request.use(request => {
        // Add parameters for each request.
        request.params = {
          page: options.page,
          per_page: options.perPge,
          incident_type: options.incidentType,
          ...request.params
        }
        // Debug code to check the request.
        console.log('Request', request)
        return request
      })

      // Debug code to check the response.
      bikeWiseApi.interceptors.response.use(response => {
        console.log('Response', response.data)
        return response
      })

      // Create a new collection for the Gridsome GraphQL API.
      const collection = actions.addCollection({
        typeName: 'Incident'
      })

      // Make the request for incidents.
      const { data } = await bikeWiseApi.get(`/incidents`)

      // Loop through and add each incident to the collection.
      for (const incident of data.incidents) {
        collection.addNode({
          id: incident.id,
          title: incident.title,
          description: incident.description
        })
      }
    })
  }
}

module.exports = BikeWiseSource
I've commented the code, so hopefully it should be easy to understand. This will be executed on build of any Gridsome site that has it configured.
I've used Axios to make the request, so you'll need that:
npm i axios --saveNow the basic source plugin project is set up, run the following within this directory:
npm linkThis will allow us to link via NPM from our Gridsome site, without having to actually publish, and install our NPM package. Create a Gridsome site (if you don't have one already) that will utilise this source plugin.
cd ..
gridsome create site-bikewise
We've generated a standard Gridsome starter. We now need to link to the source plugin before we can configure the site to make use of it:
cd site-bikewise
npm link @gridsome/source-bikewise
Edit the gridsome.config.js file and add the plugin into the plugins array:
module.exports = {
  siteName: 'Gridsome',
  plugins: [
    {
      use: '@gridsome/source-bikewise',
      options: {
        incidentType: 'crash'
      }
    }
  ]
}
Note that we can override any of the default options we've added in the plugin constructor. We can now run the development task:
npm run developOpen a browser and visit http://localhost:8080/___explore. The will open the GraphQL playground. Here was can perform a query to check if our data has been imported. Run the following GraphQL query:
{
  allIncident {
    edges {
      node {
        id
        title
        description
        path
      }
    }
  }
}
This should return a list of incidents. If so, we can now utilise this data and create some content. For example, we can include the Incident type to the gridsome.config.js by adding a templates property:
templates: {
  Incident: [
    {
      path: '/:id'
    }
  ]
}
This will look for a src/templates/Incident.vue file to render each incident. Let's add a template for this, something like:
<template>
  <Layout>
    <h1>{{ $page.incident.title }}</h1>
    <p>{{ $page.incident.description }}</p>
  </Layout>
</template>

<page-query>
query Incident ($id: ID!) {
  incident: incident (id: $id) {
    title
    description
  }
}
</page-query>
Restart the Gridsome development server. You should now be able to use one of the incident paths to see the rendered content. To make things easier, we can update the src/pages/Index.vue file to list out links to our pages:
<template>
  <Layout>

    <h1>Incidents</h1>

    <ul>
      <li v-for="edge in $page.incidents.edges" :key="edge.node.id">
        <g-link :to="edge.node.path">{{ edge.node.title }}</g-link>
      </li>
    </ul>

  </Layout>
</template>

<page-query>
query {
  incidents: allIncident {
    edges {
      node {
        id
        title
        description
        path
      }
    }
  }
}
</page-query>
Refresh the home page, and if all is well we have a list of links to our incident pages.
All done. Once you've built a working Gridsome source plugin you can now publish your package, so it can be installed in the usual way.